Difference between revisions of "Importing a New Data Source"
| Line 1: | Line 1: | ||
<translate> | <translate> | ||
| + | <!--T:1--> | ||
| + | '''This section will show you hot to import a new data source.''' | ||
| + | |||
| + | See also: | ||
| + | * [[Importing a New Data Source Tutorial|Video Tutorial]] | ||
| + | * [[Excel Importing Guide|Excel Importing Guide]] | ||
| + | * [[Importing Problems|Check Importing Problems]] | ||
| + | * '''Download a sample file here: [http://wiki.taticview.com/taticfiles/Sales.xlsx Sales.xlsx] | ||
| + | |||
| + | <!--T:2--> | ||
| + | Select the ''New datasource'' option in the [[Main Page Overview#Menu (Sidebar)|Menu (Sidebar)]] in the [[Main Page Overview|Main Page]]; | ||
| − | <!--T: | + | [[File:Barra_Lateral+en-US.PNG|100px]] |
| − | + | ||
| + | |||
| + | '''On the next screen.''' | ||
| + | |||
| + | <!--T:4--> | ||
| + | [[File:Novo arquivo+en-US.PNG||500px|link=]] | ||
| + | |||
| + | |||
| + | * '''File''': Choose the file to be imported. Click on the ''Browser'' button to search your computer for files. See [[Supported File Formats]] for more information; | ||
| + | * '''Name''': Data source name. This is the name that will be displayed in the '''[[Main Page Overview|main page]]'''; | ||
| + | * '''Description''': An optional description for the new data source. | ||
| + | |||
| + | |||
| + | If you have doubts click the below links "''Tutorial Video''", "''A sample spreasheet''" and other "''Importing Tips''". | ||
| + | |||
| + | Click '''Send File''' button to continue. | ||
| + | |||
| + | |||
| + | '''On the next screen you must inform the file specifications.''' | ||
<!--T:8--> | <!--T:8--> | ||
| − | + | [[File:Formatação dos dados+en-US.PNG|500px|link=]] | |
<!--T:2--> | <!--T:2--> | ||
| − | * | + | * '''Charset''': Specifies the file charset. Usually the correct option is automatically selected. For CSV files only; |
| + | <!--T:3--> | ||
| + | * '''Start row''': Specifies which row of the file the import process should start reading. Headings should be included if the ''Header row'' option is checked. For CSV files only; | ||
<!--T:4--> | <!--T:4--> | ||
| − | [[File: | + | * '''Date mask''': Choose the [[Date]] fields mask in the file. The selected mask must be exactly equal to the format used by dates in the file.; |
| + | |||
| + | <!--T:5--> | ||
| + | * '''Delimited by''': Specifies the columns delimiter character. Select between ''Tab'', ''Semicollon'', ''Collon'' or ''Other character'' (for ''Other'' type the desired delimiter in the field). Usually the correct option is selected automatically. For CSV files only; | ||
| + | |||
| + | <!--T:6--> | ||
| + | * '''Header''': Check if the file have a ''Header row'' that identifies the columns. The header will be used as the default name for the columns in the data source; | ||
| + | |||
| + | <!--T:7--> | ||
| + | * '''Decimal Separator''': Specifies the decimal separator used in the file. | ||
| + | |||
| + | <!--T:8--> | ||
| + | * '''Columns options''': Click the column header in the preview table to select and change its options: | ||
| + | ** '''Column data type''': Specifies the column data type: [[Date]], [[Text]] or [[Value]]; | ||
| + | ** '''Column name''': Specifies the column name.; | ||
| + | ** '''Decimal places''': Specifies how many decimal places. For [[Value]] columns only; | ||
| + | |||
| + | |||
| + | <!--T:9--> | ||
| + | Click the '''Next''' button to continue. | ||
| + | |||
| + | <!--T:11--> | ||
| + | If you are [[Import/Update data|updating]] a data source, go directly to the [[New Data Source Summary|import summary]]. | ||
| + | |||
| + | <!--T:1--> | ||
| + | '''On the next screen you can generate automatically a set of dashboards with your imported data.''' | ||
| + | |||
| + | * The process will try to find compatible dashboards with the information you provided. New generated dashboards will have the [[File:db_genenerated.png]] icon. | ||
| + | |||
| + | |||
| + | [[File:Colunas geração+en-US.PNG|500px]] | ||
| + | |||
| + | |||
| + | <!--T:2--> | ||
| + | * Select the main [[Date]], [[Text]] and [[Value]] columns that TaticView will use to automatic generate dashboards. | ||
| + | |||
| + | Click the '''Next''' button. To skip the automatic dashboards generation, click '''Skip step'''. You can do this later. See [[Generate dashboards]]. | ||
<!--T:5--> | <!--T:5--> | ||
| − | See [[ | + | See '''[[New Data Source Summary]]''' for information on how to continue. |
| + | |||
| + | <!--T:1--> | ||
| + | [[File:Resumo importação+en US.PNG|500px]] | ||
| − | <!--T: | + | <!--T:2--> |
| − | ''' | + | Check the summary information and click the '''Finish''' button to complete the operation and schedule the data import. |
| + | |||
| − | <!--T: | + | <!--T:3--> |
| − | + | Use the Refresh option in the [[Main Page Overview#Data Sources|main page]] to update the data source information with it current status and check whether the import is finished. | |
</translate> | </translate> | ||
Revision as of 13:37, 20 October 2015
This section will show you hot to import a new data source.
See also:
- Video Tutorial
- Excel Importing Guide
- Check Importing Problems
- Download a sample file here: Sales.xlsx
Select the New datasource option in the Menu (Sidebar) in the Main Page;

On the next screen.

- File: Choose the file to be imported. Click on the Browser button to search your computer for files. See Supported File Formats for more information;
- Name: Data source name. This is the name that will be displayed in the main page;
- Description: An optional description for the new data source.
If you have doubts click the below links "Tutorial Video", "A sample spreasheet" and other "Importing Tips".
Click Send File button to continue.
On the next screen you must inform the file specifications.
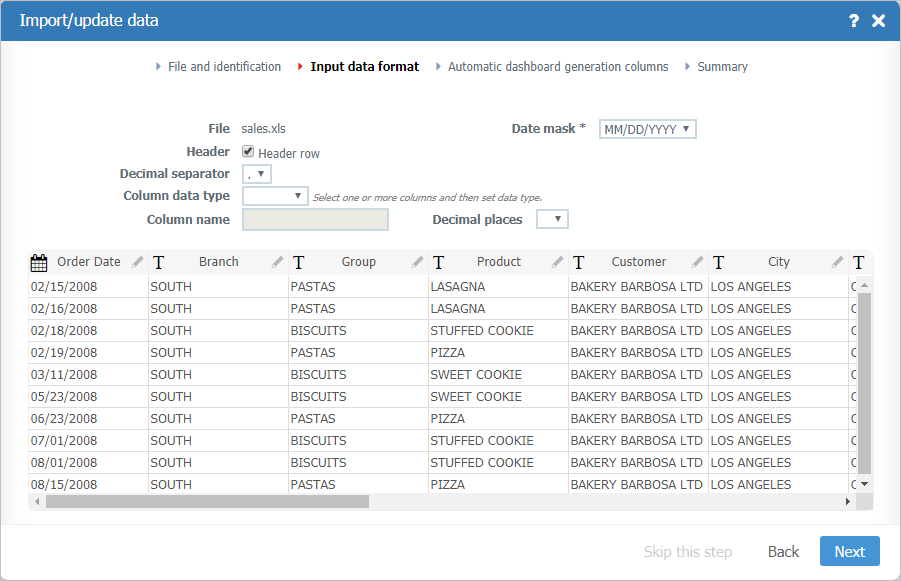
- Charset: Specifies the file charset. Usually the correct option is automatically selected. For CSV files only;
- Start row: Specifies which row of the file the import process should start reading. Headings should be included if the Header row option is checked. For CSV files only;
- Date mask: Choose the Date fields mask in the file. The selected mask must be exactly equal to the format used by dates in the file.;
- Delimited by: Specifies the columns delimiter character. Select between Tab, Semicollon, Collon or Other character (for Other type the desired delimiter in the field). Usually the correct option is selected automatically. For CSV files only;
- Header: Check if the file have a Header row that identifies the columns. The header will be used as the default name for the columns in the data source;
- Decimal Separator: Specifies the decimal separator used in the file.
- Columns options: Click the column header in the preview table to select and change its options:
Click the Next button to continue.
If you are updating a data source, go directly to the import summary.
On the next screen you can generate automatically a set of dashboards with your imported data.
- The process will try to find compatible dashboards with the information you provided. New generated dashboards will have the
 icon.
icon.

- Select the main Date, Text and Value columns that TaticView will use to automatic generate dashboards.
Click the Next button. To skip the automatic dashboards generation, click Skip step. You can do this later. See Generate dashboards.
See New Data Source Summary for information on how to continue.

Check the summary information and click the Finish button to complete the operation and schedule the data import.
Use the Refresh option in the main page to update the data source information with it current status and check whether the import is finished.