Difference between revisions of "Share dashboards"
| (30 intermediate revisions by 4 users not shown) | |||
| Line 1: | Line 1: | ||
| + | <languages/> | ||
| − | |||
| + | <translate> | ||
| + | |||
| + | <!--T:4--> | ||
| + | <div class="index-right">__toc__</div> | ||
| + | |||
| + | <!--T:1--> | ||
| + | You can share your<span style="color: red;">*</span> dashboards with other users ('''see a [[Sharing a Dashboard Tutorial|video tutorial]]'''): . | ||
| + | |||
| + | <!--T:2--> | ||
This feature is very useful. You can organize, control, show and filter your data as you want and distribute it safely. | This feature is very useful. You can organize, control, show and filter your data as you want and distribute it safely. | ||
| + | <!--T:3--> | ||
You can create a single dashboard with complete information and share for each user only what they need to see. | You can create a single dashboard with complete information and share for each user only what they need to see. | ||
| − | |||
| − | == Create a new share == | + | <!--T:27--> |
| + | <span style="color: red;">*</span> Can not share dashboards that have been received through other shares; | ||
| + | |||
| + | <!--T:28--> | ||
| + | <span style="color: red;">*</span> To share dashboards, you must have the '''Shared users''' hired feature; | ||
| + | |||
| + | |||
| + | |||
| + | == Create a new share == <!--T:5--> | ||
| + | |||
| + | |||
| + | |||
| + | <!--T:29--> | ||
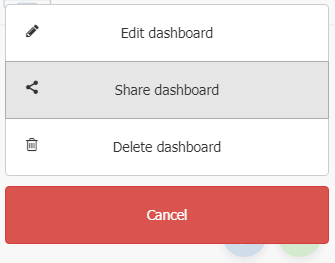
| + | To share a dashboard, you must access the '''Share dashboard''' option, available in the context menu of each dashboard card, or use the '''Share''' option available while dashboard execution: | ||
| + | |||
| + | |||
| + | <!--T:30--> | ||
| + | :{| class="images-table" | ||
| + | | On desktop | ||
| + | |- | ||
| + | |[[File:Share dashboard card en-US.png|link=]] | ||
| + | |- | ||
| + | | In mobile devices | ||
| + | |- | ||
| + | |[[File:Dashboard options mobile en-US.png|link=]] [[File:Share dashboard card mobile en-US.png|link=]] | ||
| + | |- | ||
| + | | During execution (desktop and mobile devices) | ||
| + | |- | ||
| + | |[[File:Share dashboard execution en-US.png|link=]] | ||
| + | |} | ||
| + | |||
| + | |||
| + | <!--T:31--> | ||
| + | By doing this, the '''Manage Shares''' screen appears: | ||
| + | |||
| + | |||
| + | <!--T:32--> | ||
| + | :[[File:Manage share en-US.png|link=]] | ||
| + | |||
| + | |||
| + | <!--T:33--> | ||
| + | On this screen you can, in addition to adding new sharing invitations: | ||
| + | |||
| + | |||
| + | <!--T:34--> | ||
| + | - check with whoever has already shared this dashboard; | ||
| + | |||
| + | <!--T:35--> | ||
| + | - check the status of each invitation sent; | ||
| + | |||
| + | <!--T:36--> | ||
| + | - change the [[Permission filters|Permissions]] of each invitation sent; | ||
| + | |||
| + | <!--T:37--> | ||
| + | - grant [[Write permission|written permission]] to the guest; | ||
| + | |||
| + | <!--T:38--> | ||
| + | - resend an invitation that is pending; | ||
| + | |||
| + | <!--T:39--> | ||
| + | - remove an invitation sent; | ||
| + | |||
| + | <!--T:40--> | ||
| + | - change the name of a guest (useful to make it easier to find them in the list of suggestions displayed when adding a new guest); | ||
| + | |||
| + | |||
| + | <!--T:41--> | ||
| + | When you click '''New invitation''', a new entry will be added on the screen to inform you the ''name'', ''email'', and guest permissions settings. | ||
| + | |||
| + | |||
| + | <!--T:43--> | ||
| + | To save and send the invitation, just click '''Save''' button. If this is disabled, check that the data (''name'' and ''email'') were filled in correctly. | ||
| + | |||
| + | |||
| + | <!--T:44--> | ||
| + | Another way to share dashboards is by using the '''Share dashboards''' option in the menu on the Dashboards tab of the [[Main Page Overview|main page]]: | ||
| + | |||
| + | |||
| + | <!--T:45--> | ||
| + | :{| class="images-table" | ||
| + | | On desktop | ||
| + | |- | ||
| + | |[[File:Share dashboard menu en-US.png|link=]] | ||
| + | |- | ||
| + | | In mobile devices | ||
| + | |- | ||
| + | |[[File:Share dashboard mobile menu en-US.png|link=]] | ||
| + | |} | ||
| + | |||
| + | |||
| + | <!--T:46--> | ||
| + | Now you have access to Share manage page | ||
| + | |||
| + | |||
| + | <!--T:47--> | ||
| + | :{| class="images-table" | ||
| + | | On desktop | ||
| + | |- | ||
| + | |[[File:Share_manager_by_dashboard_en-US.png|link=]] | ||
| + | |- | ||
| + | | In mobile devices | ||
| + | |- | ||
| + | |[[File:FileShare_manager_by_dashboard_mobile_en-US.png|link=]] | ||
| + | |} | ||
| + | |||
| + | |||
| + | |||
| + | |||
| + | <!--T:48--> | ||
| + | In this screen you can, in addition to adding new dashboard for sharing: | ||
| + | |||
| + | |||
| + | <!--T:67--> | ||
| + | You can manage the shares by two different visions | ||
| + | |||
| + | <!--T:68--> | ||
| + | - '''by Dashboards''', where you can manage all shared dashboards shared | ||
| + | |||
| + | <!--T:69--> | ||
| + | - '''by User''', where you cam manage the shares by user view | ||
| + | |||
| + | |||
| + | <!--T:70--> | ||
| + | '''by Dashboard View''' | ||
| + | |||
| + | |||
| + | <!--T:71--> | ||
| + | :{| class="images-table" | ||
| + | | On desktop | ||
| + | |- | ||
| + | |[[File:Share_manager_by_dashboard_en-US.png|link=]] | ||
| + | |- | ||
| + | | In mobile devices | ||
| + | |- | ||
| + | |[[File:FileShare_manager_by_dashboard_mobile_en-US.png|link=]] | ||
| + | |} | ||
| + | |||
| + | |||
| + | <!--T:49--> | ||
| + | - check how status of sharing process for each shared dashboard; | ||
| + | |||
| + | <!--T:51--> | ||
| + | - edit a share; | ||
| + | |||
| + | <!--T:52--> | ||
| + | - remove a share of a dashboard for all users; | ||
| + | |||
| + | |||
| + | <!--T:72--> | ||
| + | '''by User View''' | ||
| + | |||
| + | |||
| + | <!--T:73--> | ||
| + | :{| class="images-table" | ||
| + | | On desktop | ||
| + | |- | ||
| + | |[[File:Share_manager_by_user_en-US.png|link=]] | ||
| + | |- | ||
| + | | In mobile devices | ||
| + | |- | ||
| + | |[[File:Share_manager_by_user_mobile_en-US.png|link=]] | ||
| + | |} | ||
| + | |||
| + | |||
| + | <!--T:74--> | ||
| + | - check how status of sharing process for each shared user; | ||
| + | |||
| + | <!--T:75--> | ||
| + | - edit a share; | ||
| + | |||
| + | <!--T:76--> | ||
| + | - remove a share of all dashboards for this users; | ||
| + | |||
| + | |||
| + | <!--T:53--> | ||
| + | When you click '''Add dashboard''', the list of panels is displayed so that you can select what you want to share. | ||
| + | |||
| + | <!--T:54--> | ||
| + | :[[File:share_select_dashboard.png|link=]] | ||
| − | |||
| + | <!--T:55--> | ||
| + | Selecting a dashboard will display the ''Manage shares'' screen. | ||
| − | + | == Edit a share == <!--T:13--> | |
| − | |||
| + | <!--T:56--> | ||
| + | To edit a sent share, you must access the '''Manage shares''' screen (see how to do this in the previous topic ''Create a new share''). | ||
| − | + | <!--T:77--> | |
| + | We have two different views to edit shares. | ||
| − | + | <!--T:78--> | |
| + | - When editing from the '''by Dashboard''' view, we show the users who has received your shares for the selected dashboard | ||
| + | <!--T:79--> | ||
| + | [[File:Managing_dashboard_shares_en-US.png]] | ||
| − | |||
| − | + | <!--T:80--> | |
| + | - When editing from the '''by User''' view, we show the dashboards that were shared to selected user | ||
| + | <!--T:81--> | ||
| + | [[File:Managing_user_shares_en-US.png]] | ||
| − | |||
| + | <!--T:57--> | ||
| + | Editing the shares allows you to make the following changes: | ||
| − | |||
| + | <!--T:58--> | ||
| + | - change the name of the guest. This change does not share it again, it only changes the name of the guest on the current share, and updates the name in the list of suggestions that appears when you add new invites; | ||
| − | + | <!--T:59--> | |
| + | - change the [[Permission filters|filters/permissions]] of the share. Used for when you want to change what restrictions on the data the guest will have; | ||
| − | [[ | + | <!--T:60--> |
| + | - change the guest's [[Write permission|write permission]]. Used for when you want the guest to be able to edit the shared dashboard; | ||
| + | <!--T:61--> | ||
| + | - also allows you to resend an invitation that has status ''pending''. | ||
| − | + | == Delete a share == <!--T:21--> | |
| − | |||
| + | <!--T:62--> | ||
| + | You can remove all shares from a dashboard, as well as remove only one specific invitation. | ||
| − | |||
| − | [[ | + | <!--T:63--> |
| + | To remove all shares you send from a given dashboard, you must use the '''Share dashboards''' option available in the dashboards tab menu on the [[Main Page Overview|main screen]]. On the screen if it is displayed, just click the delete icon and confirm. With this, all shares of this dashboard will be removed. | ||
| + | <!--T:64--> | ||
| + | :{| class="images-table" | ||
| + | | On desktop | ||
| + | |- | ||
| + | |[[File:Share dashboard menu en-US.png|link=]] | ||
| + | |- | ||
| + | | In mobile devices | ||
| + | |- | ||
| + | |[[File:Share dashboard mobile menu en-US.png|link=]] | ||
| + | |} | ||
| − | |||
| + | <!--T:65--> | ||
| + | Or, if you just want to remove a specific invitation, you must go to the ''Manage Shares'' screen, using the '''Share dashboard''' option available in the context menu of the dashboards and remove only the invitation you want. To do this, just click the '''Delete Sharing''' option. Only this invitation will be removed, all other invitations from this dashboard will remain. | ||
| − | |||
| + | <!--T:66--> | ||
| + | :{| class="images-table" | ||
| + | | On desktop | ||
| + | |- | ||
| + | |[[File:Share dashboard card en-US.png|link=]] <span style="margin-left: 20px;">[[File:Remove specific share en-US.png|link=]]</span> | ||
| + | |- | ||
| + | | In mobile devices | ||
| + | |- | ||
| + | |[[File:Dashboard options mobile en-US.png|300px|link=]] <span style="margin-left: 10px;">[[File:Share dashboard card mobile en-US.png|300px|link=]]</span> <span style="margin-left: 10px;">[[File:Remove specific share en-US.png|600px|link=]]</span> | ||
| + | |} | ||
| − | + | == Accept a share == <!--T:25--> | |
| − | [[ | + | <!--T:26--> |
| + | * To learn how to accept a panel share sent to you, see [[Accept shared dashboards]]. | ||
| + | </translate> | ||
Revision as of 18:26, 14 June 2021
You can share your* dashboards with other users (see a video tutorial): .
This feature is very useful. You can organize, control, show and filter your data as you want and distribute it safely.
You can create a single dashboard with complete information and share for each user only what they need to see.
* Can not share dashboards that have been received through other shares;
* To share dashboards, you must have the Shared users hired feature;
To share a dashboard, you must access the Share dashboard option, available in the context menu of each dashboard card, or use the Share option available while dashboard execution:
On desktop 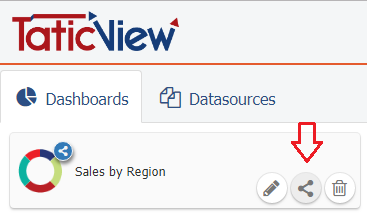
In mobile devices 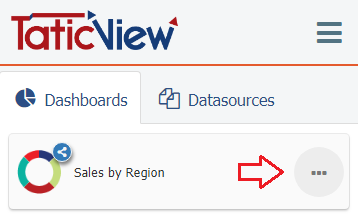
During execution (desktop and mobile devices) 
By doing this, the Manage Shares screen appears:
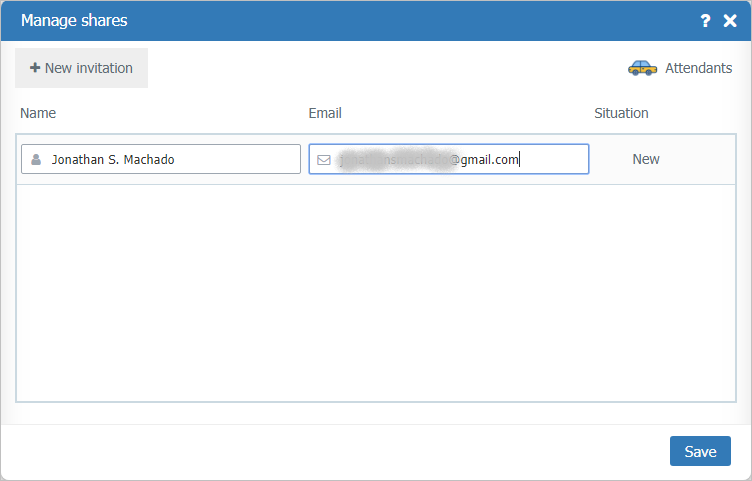
On this screen you can, in addition to adding new sharing invitations:
- check with whoever has already shared this dashboard;
- check the status of each invitation sent;
- change the Permissions of each invitation sent;
- grant written permission to the guest;
- resend an invitation that is pending;
- remove an invitation sent;
- change the name of a guest (useful to make it easier to find them in the list of suggestions displayed when adding a new guest);
When you click New invitation, a new entry will be added on the screen to inform you the name, email, and guest permissions settings.
To save and send the invitation, just click Save button. If this is disabled, check that the data (name and email) were filled in correctly.
Another way to share dashboards is by using the Share dashboards option in the menu on the Dashboards tab of the main page:
On desktop 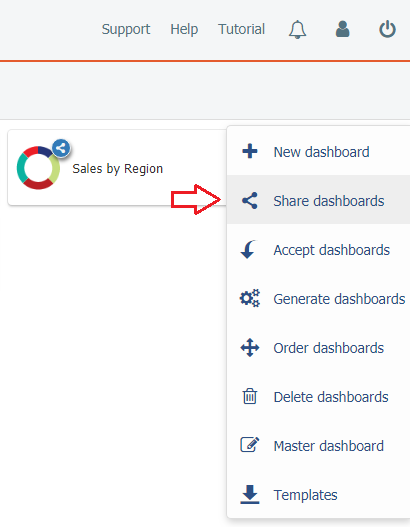
In mobile devices 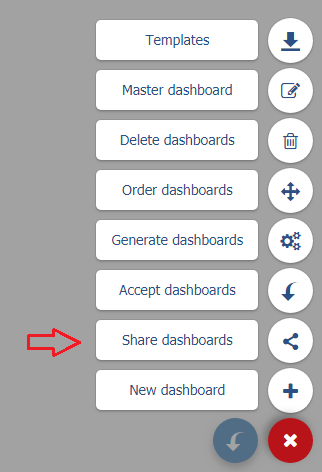
Now you have access to Share manage page
On desktop 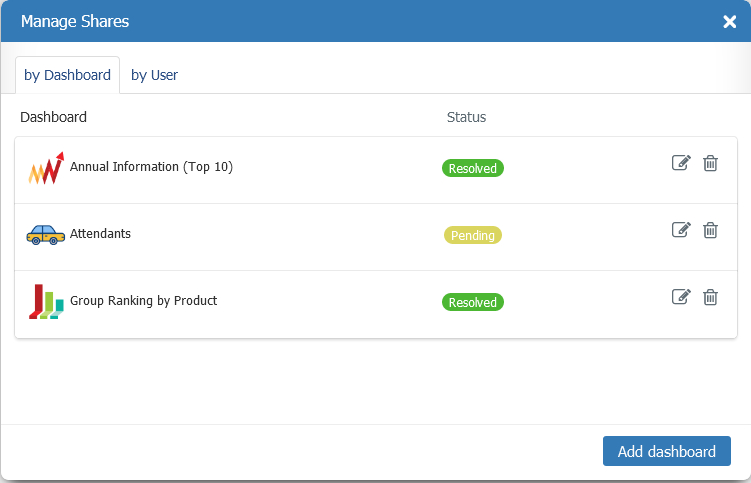
In mobile devices 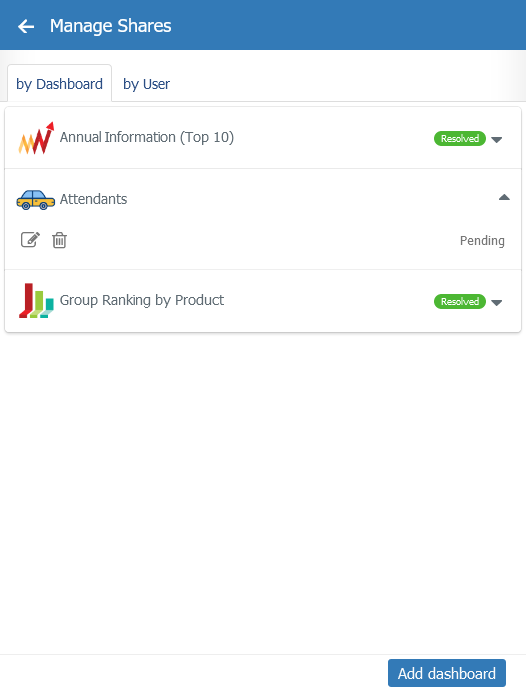
In this screen you can, in addition to adding new dashboard for sharing:
You can manage the shares by two different visions
- by Dashboards, where you can manage all shared dashboards shared
- by User, where you cam manage the shares by user view
by Dashboard View
On desktop
In mobile devices
- check how status of sharing process for each shared dashboard;
- edit a share;
- remove a share of a dashboard for all users;
by User View
On desktop 
In mobile devices 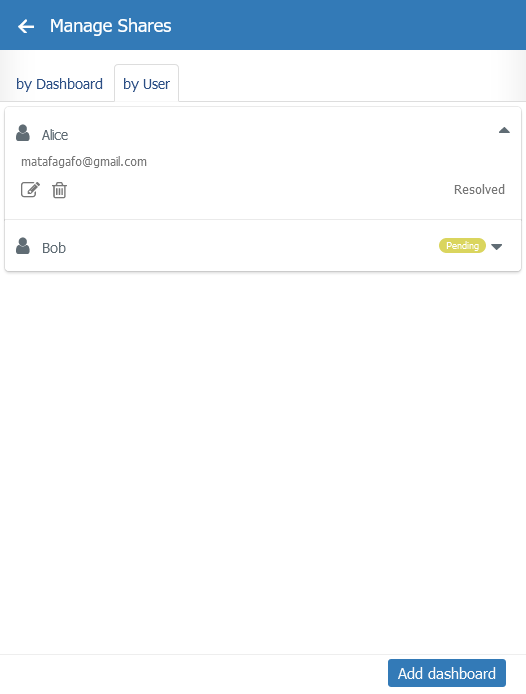
- check how status of sharing process for each shared user;
- edit a share;
- remove a share of all dashboards for this users;
When you click Add dashboard, the list of panels is displayed so that you can select what you want to share.

Selecting a dashboard will display the Manage shares screen.
To edit a sent share, you must access the Manage shares screen (see how to do this in the previous topic Create a new share).
We have two different views to edit shares.
- When editing from the by Dashboard view, we show the users who has received your shares for the selected dashboard

- When editing from the by User view, we show the dashboards that were shared to selected user

Editing the shares allows you to make the following changes:
- change the name of the guest. This change does not share it again, it only changes the name of the guest on the current share, and updates the name in the list of suggestions that appears when you add new invites;
- change the filters/permissions of the share. Used for when you want to change what restrictions on the data the guest will have;
- change the guest's write permission. Used for when you want the guest to be able to edit the shared dashboard;
- also allows you to resend an invitation that has status pending.
You can remove all shares from a dashboard, as well as remove only one specific invitation.
To remove all shares you send from a given dashboard, you must use the Share dashboards option available in the dashboards tab menu on the main screen. On the screen if it is displayed, just click the delete icon and confirm. With this, all shares of this dashboard will be removed.
On desktop
In mobile devices
Or, if you just want to remove a specific invitation, you must go to the Manage Shares screen, using the Share dashboard option available in the context menu of the dashboards and remove only the invitation you want. To do this, just click the Delete Sharing option. Only this invitation will be removed, all other invitations from this dashboard will remain.
On desktop 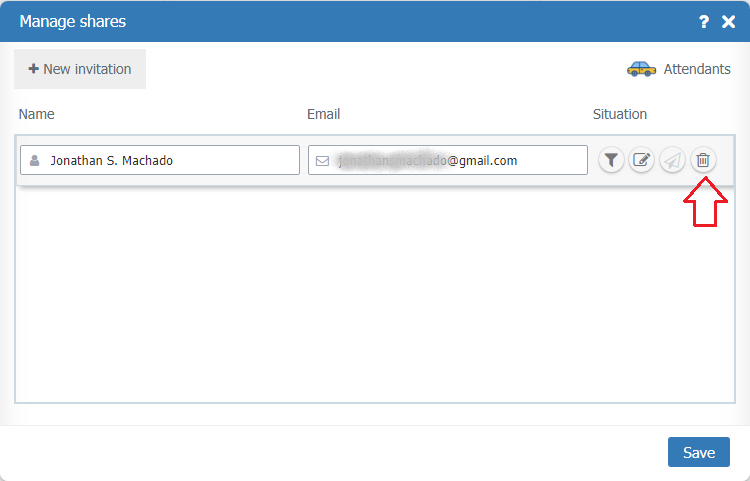
In mobile devices
- To learn how to accept a panel share sent to you, see Accept shared dashboards.