Difference between revisions of "Manage Access/en"
(Importing a new version from external source) |
(Updating to match new version of source page) |
||
| (10 intermediate revisions by the same user not shown) | |||
| Line 1: | Line 1: | ||
<languages/> | <languages/> | ||
| + | |||
| + | |||
| + | <div style="float: right;">__TOC__</div> | ||
| + | |||
| + | On the Manage Access screen we have two tabs: | ||
| + | |||
| + | * '''Connected devices''' | ||
| + | * '''Tokens''' | ||
| + | |||
| + | |||
| + | ===Connected devices=== | ||
| + | |||
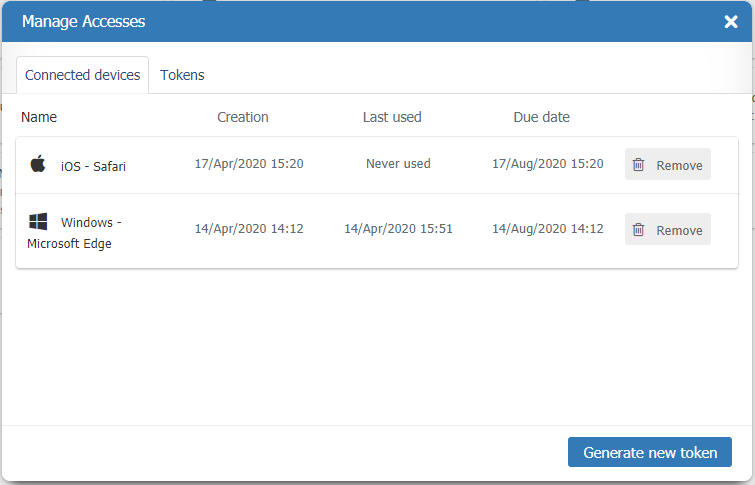
| + | Each time you check the option "Remember Me" during login an entry will be added to the list of connected devices. | ||
| + | |||
| + | This list is by device (Desktop, mobile, etc ...) and browser (Chrome, Edge, Firefox, etc ...). | ||
| + | |||
| + | After 4 months the connections expire. | ||
| + | |||
| + | It is also possible to disconnect a device/browser by deleting it from the list. | ||
| + | |||
| + | |||
| + | |||
| + | [[File:devices+en-US.PNG|link=]] | ||
| + | |||
| + | |||
| + | |||
| + | ===Tokens=== | ||
Token is like a password generated by TaticView that allows access to your account through [[TVCli]]. It can be revoked by you at any time, thus allowing you to decide who and when can access your account in TaticView. | Token is like a password generated by TaticView that allows access to your account through [[TVCli]]. It can be revoked by you at any time, thus allowing you to decide who and when can access your account in TaticView. | ||
| − | To manage your Access Tokens, you must access your account in TaticView and, on the [[Main Page Overview|main screen]], | + | To manage your Access Tokens, you must access your account in TaticView and, on the [[Main Page Overview|main screen]], click in ''My Account'' and then in '''Access tokens''' option. |
| + | |||
The tokens management screen will be displayed: | The tokens management screen will be displayed: | ||
| Line 12: | Line 40: | ||
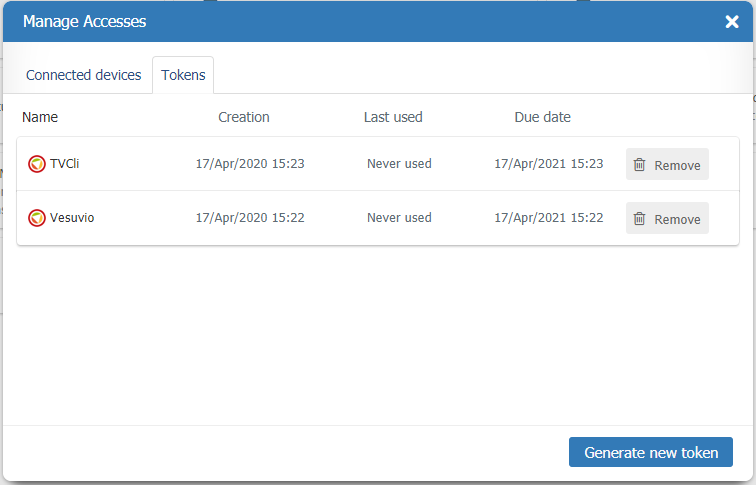
| − | + | The following information will be displayed on this screen: | |
| − | * | + | * Icon identifier of how the token was generated, which can be: |
| − | ** | + | ** [[File:token_interface.PNG|link=]]: Identifies the tokens on which were generated through TaticView; |
| − | ** | + | ** [[File:token_tvcli.PNG|link=]]: Identifies the tokens on which were generated through TVCli; |
| − | * | + | * Your tokens name; |
| − | * | + | * Tokens creation date. |
| − | * | + | * Date that each token was last used; |
| − | * | + | * Each token expiration date. |
| − | * | + | * ''Revoke'' button, used to invalidate the token; |
| − | + | Besides, on this screen, you can perform the creation of a new token. To do so, just enter the new token name in the Name for ID field and then click on ''GENERATE NEW TOKEN''. Then, the following screen will be displayed: | |
Latest revision as of 15:47, 7 August 2021
Contents
On the Manage Access screen we have two tabs:
- Connected devices
- Tokens
Connected devices
Each time you check the option "Remember Me" during login an entry will be added to the list of connected devices.
This list is by device (Desktop, mobile, etc ...) and browser (Chrome, Edge, Firefox, etc ...).
After 4 months the connections expire.
It is also possible to disconnect a device/browser by deleting it from the list.
Tokens
Token is like a password generated by TaticView that allows access to your account through TVCli. It can be revoked by you at any time, thus allowing you to decide who and when can access your account in TaticView.
To manage your Access Tokens, you must access your account in TaticView and, on the main screen, click in My Account and then in Access tokens option.
The tokens management screen will be displayed:
The following information will be displayed on this screen:
- Icon identifier of how the token was generated, which can be:
 : Identifies the tokens on which were generated through TaticView;
 : Identifies the tokens on which were generated through TVCli;
- Your tokens name;
- Tokens creation date.
- Date that each token was last used;
- Each token expiration date.
- Revoke button, used to invalidate the token;
Besides, on this screen, you can perform the creation of a new token. To do so, just enter the new token name in the Name for ID field and then click on GENERATE NEW TOKEN. Then, the following screen will be displayed:

This screen will display your Token, as well as guidelines on how to use it.
Important: Closing this screen will no longer be able to get your token. You will need to generate a new access token.