Formatação Condicional
Define diferentes formatações (estilos) às linhas, colunas e células das tabelas simples e cruzadas, com base em condições/seleções (regras). Estas condições podem ser um valor fixo, intervalo de valores, maior que determinado valor, etc.
A formatação condicional, permite modificar as seguintes propriedades das linhas e/ou colunas das tabelas, baseando-se na condição definida para cada regra:
- Cor de fundo das linhas, colunas (tabela cruzada) e células;
- Cor da fonte;
- Estilos da fonte (negrito, itálico e sublinhado);
- Adicionar ícones (símbolos) nas células (apenas quando a regra é aplicada nas colunas, exceto para pivô 2 da tabela cruzada);
- Escolher a cor do símbolo;
Para facilitar a configuração das formatações, disponibilizamos algumas formatações padrões onde é necessário apenas criar as condições para aplicação da formatação.
Existem duas formas de aplicar a formatação condicional nas tabelas do TaticView. Aplicar regras por linhas (regras do objeto), que serão aplicadas nas linhas das tabelas. Ou aplicar regras por coluna/célula, onde as formatações serão aplicadas apenas nas colunas/células da tabela.
Regras para as Linhas
Este tipo de regra será aplicada para toda a linha da tabela, caso a condição da regra seja verdadeira.
Para criar regras para as linhas da tabela, basta selecionar o objeto desejado e clicar sobre a opção Formatação Condicional na aba Objeto da barra lateral do design.
Ao criar uma nova regra para as linhas, a seguinte tela será exibida:
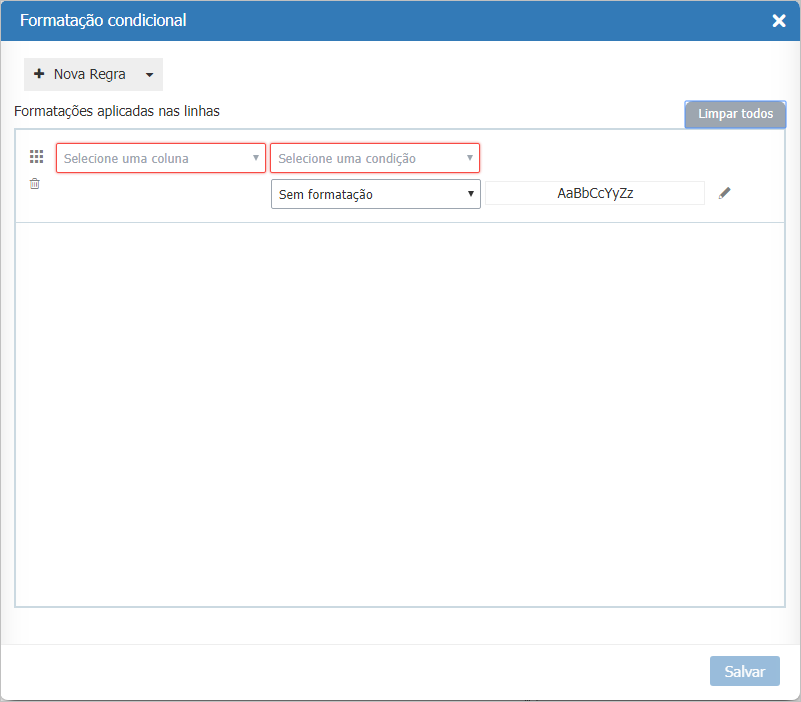
Para facilitar o uso será criada automaticamente uma regra onde você deverá configurar qual a coluna de referência, a condição para a aplicação da formatação e também qual a formatação desejada. Você poderá também adicionar outras regras com condições e formatações distintas.
The rules for the rows can have the following properties edited:
- Font styles (bold, italic, and underline);
- Font color;
- Background color;
Besides, all these rules have the following pre-set formattings:
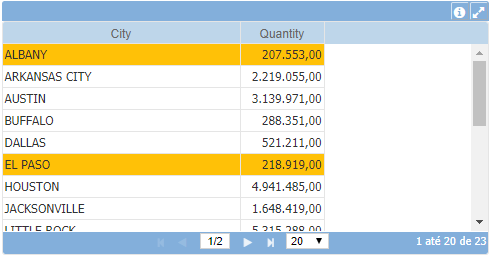
- Blue background - applies a blue background to rows that fit into the rule condition.
- Green background - applies a green background to rows that fit into the rule condition.
- Yellow background - applies a yellow background to rows that fit into the rule condition.
- Red background - applies a red background to rows that fit into the rule condition.
We also provide a set of predefined rules to apply to the rows. This set of rules creates three rules applying different background colors to the rows.
All you have to do is to set the reference column and the condition to apply the formatting.
Columns rules
The columns rules are applied only to the desired column or cell on which the condition is true.
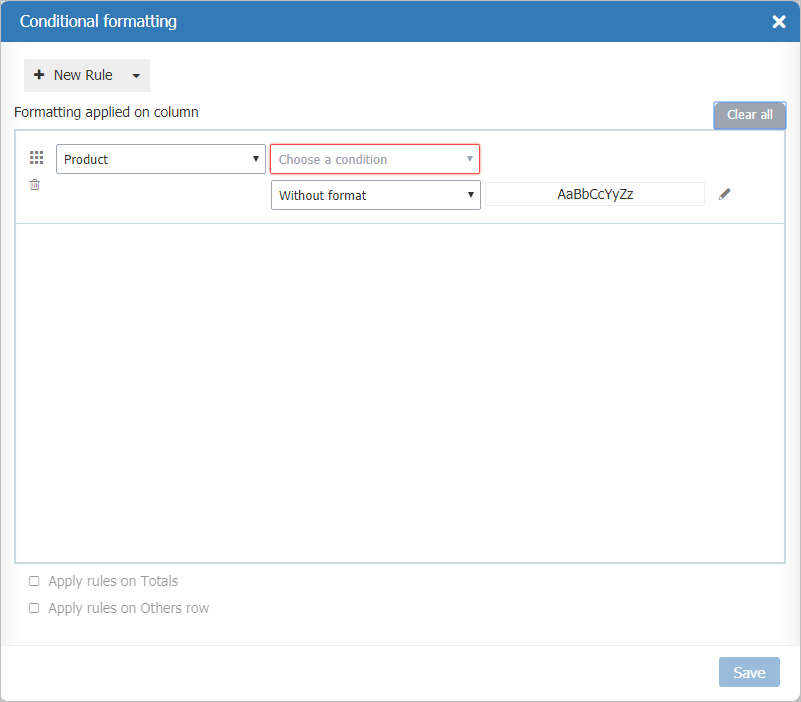
To create the rules for the columns/cells, you need to select the column where you want to apply the conditional formatting, and then click on the Conditional Formatting option on the Column tab on the design sidebar.
This type of rule also allows you to add symbols to the columns/cells.
The following screen will be shown when you create a new rule to the columns.
- If the column type is text:
- If the column type is numeric:
To facilitate use, just like the rules for the rows, rules are created automatically. You'll only have to define the condition and the formatting rule.
One rule will be set to text columns and three for numeric columns. Besides, you can also create new rules or edit/delete an automatically created rule.
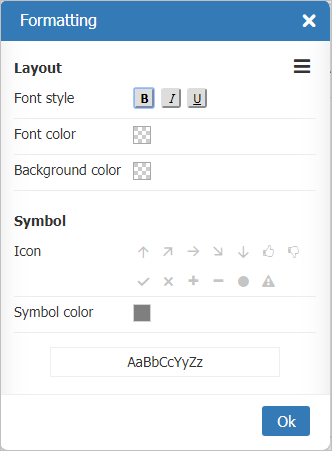
The rules for the columns can have the following properties edited:
- Font styles (bold, italic, and underline);
- Font color;
- Background color;
- Icon;
- Symbol color;
Besides that, these rules also have the following predefined formatting:
- Blue background - applies a blue background to rows that fit into the rule condition.
- Green background - applies a green background to rows that fit into the rule condition.
- Yellow background - applies a yellow background to rows that fit into the rule condition.
- Red background - applies a red background to rows that fit into the rule condition.
- Blue traffic light - Adds a blue traffic light to rows that fit into the rule condition.
- Green traffic light - Adds a green traffic light to rows that fit into the rule condition.
- Yellow traffic light - Adds a yellow traffic light to rows that fit into the rule condition.
- Red traffic light - Adds a red traffic light to rows that fit into the rule condition.
We also provide three predefined sets of rules to be applied to the columns/cells.
- Background color: Creates a set of rules that will be applied as Background Color to the selected column;
- Traffic lights: Creates a set of rules to apply traffic lights to the selected column;
- Directional: Creates a set of rules to apply directional arrows to the selected column;
You will only need to configure the reference column ( the column that is going to be evaluated by the condition) and the condition to apply the rules.
The rules for the columns also allow them to be applied to Totals (total row and total column) and the Others row when they are shown in the tables.
Creating a rule
Click the button + New Rule on the Conditional Formatting or use one of the predefined set of rules by clicking on the arrow next to this button.
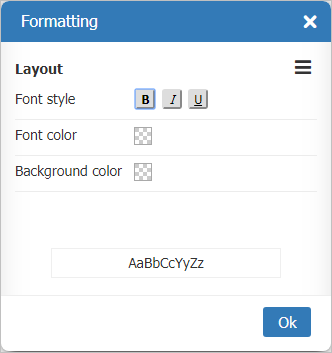
It is possible to select the reference column (the column that is going to be available), the condition to apply the rule and to define the value or range of figures that are going to be tested by the condition when you create a new rule. It is necessary to define the format of the condition for applying the rule after it has been configured. There are predefined formatting options, but it is possible to edit a custom formatting by clicking over the ![]() icon. In this case, the following screen will be shown, allowing to edit the available properties.
icon. In this case, the following screen will be shown, allowing to edit the available properties.
- Row rules
- Columns rules
You can add as many rules as you like.
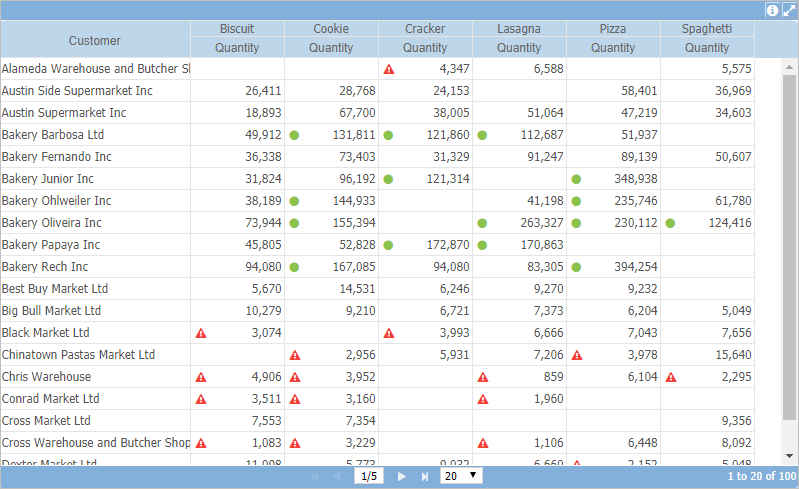
Examples of Rule Settings:
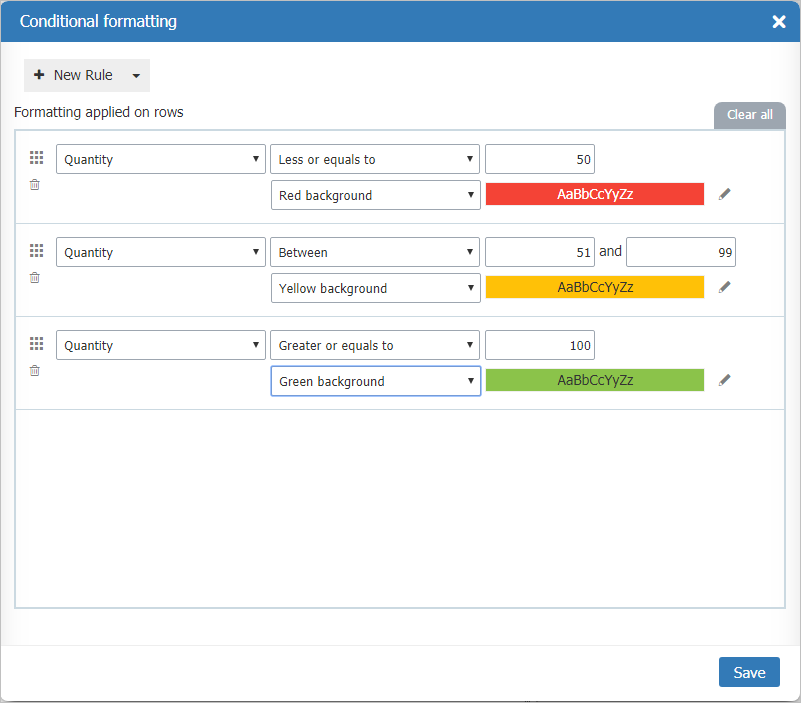
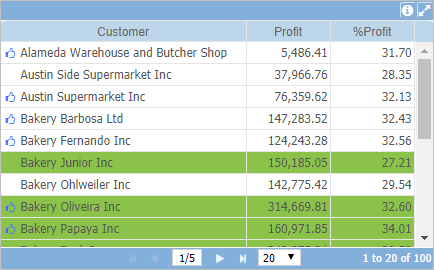
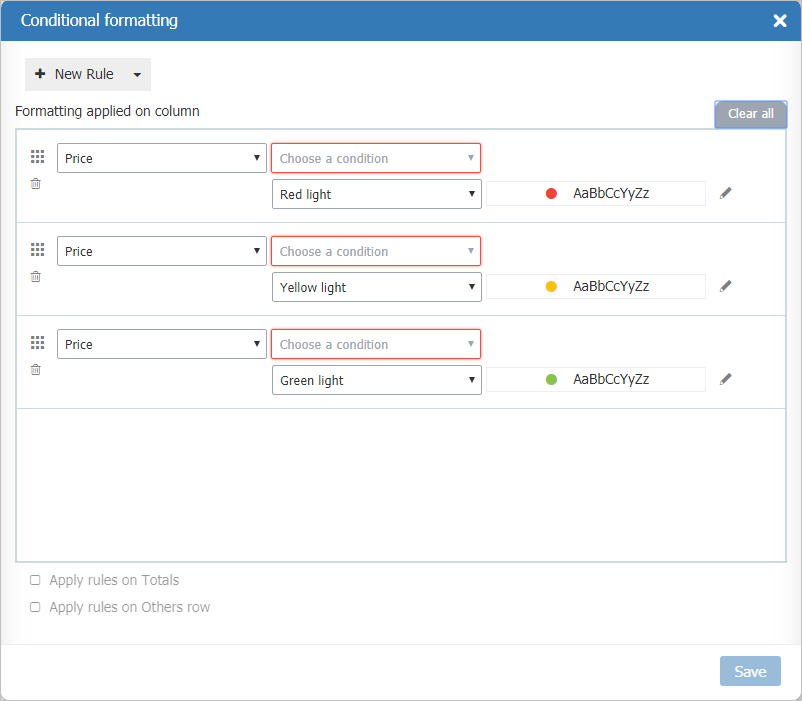
On the example above, three rules were added that modify the row's background color if the condition is true.
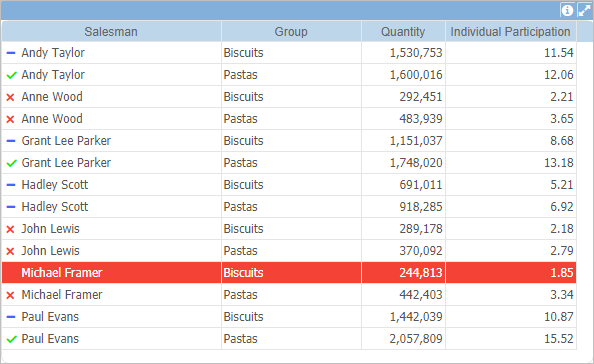
In this example, it was added a rule that applies the bold font to the row.
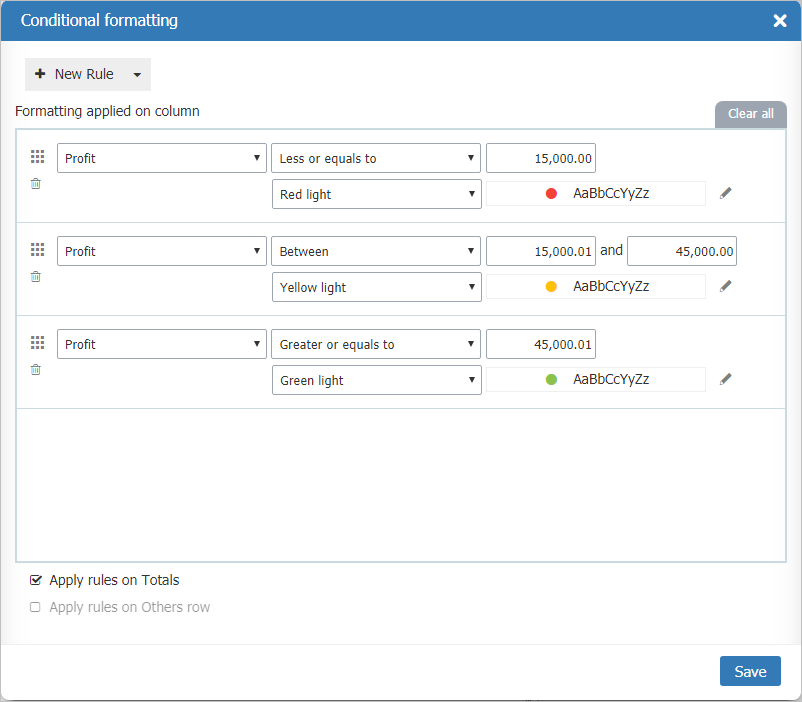
Here we are adding three symbols (traffic lights) determined by the values of the column and apllying in the totals.
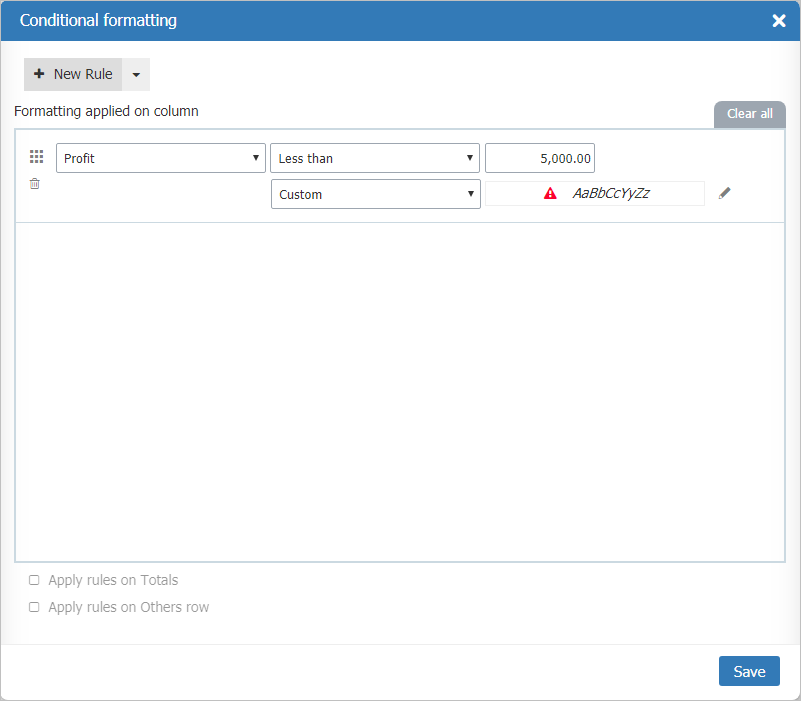
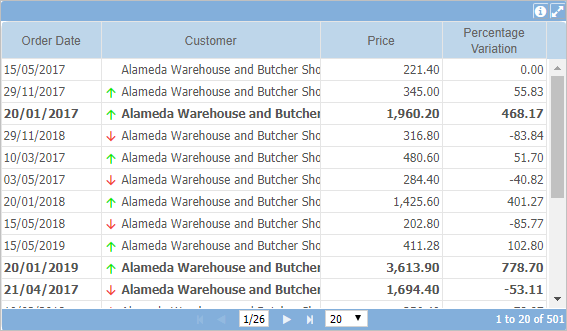
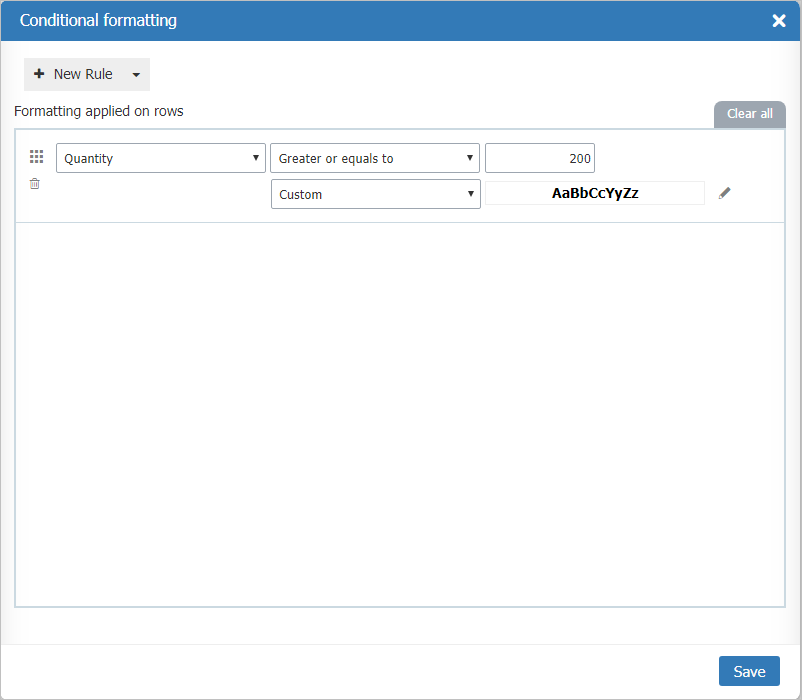
In this example, we are adding an alert symbol and applying italics when the Profit are below 5,000.00.
Deleting a rule
To delete a rule, you have to click the icon ![]() on the rule you want to remove. Use the button
on the rule you want to remove. Use the button ![]() to delete all rules.
to delete all rules.
Changing the order of the rules
You have to click the icon ![]() and drag the rule to the desired position to change the order of the rules. Sometimes is necessary to change the order of the rules to define an application priority. For example, the last rule on the screen has priority over the first rule. In case the rules modify the same priority. The rules are applied individually if they modify different properties.
and drag the rule to the desired position to change the order of the rules. Sometimes is necessary to change the order of the rules to define an application priority. For example, the last rule on the screen has priority over the first rule. In case the rules modify the same priority. The rules are applied individually if they modify different properties.
Important:
- The last rule has the preference in case two rules modify the same row/column priority (background color, font color, etc).
- The columns/cells rules have priority over row rules.
Applies to
Examples of tables with applied rules