Difference between revisions of "Main Page Overview/en"
(Importing a new version from external source) |
(Updating to match new version of source page) |
||
| (11 intermediate revisions by the same user not shown) | |||
| Line 2: | Line 2: | ||
| − | + | <div class="index-right">__TOC__</div> | |
| + | = The main page = | ||
| + | Soon after logging in to TaticView, you are redirected to the ''Main Page''. | ||
| − | + | This page is divided into two main tabs. The ''Dashboards'' tab where the dashboards you create will be available, the dashboards that other users [[Share dashboards|share]]/[[Copy Dashboards to other users|copy]] for you, and also the dashboards that are made available when you install one of our [[Templates|templates]]. And the ''Datasources'' tab where your data files will be available, generated by importing your spreadsheets/files, as well as the data files made available when you install one of our [[Templates|templates]]. | |
| − | + | On the main page, you'll still have access to your [[User profile|account settings]], [https://support.taticview.com/open.php?&lang=en_US support], our [[Help Index|help documentation]], you can check your notifications, etc. | |
| − | |||
| − | + | In addition, on the main page, you may receive alerts regarding your [[Subscriptions|subscription]]. Such as ending the validity of temporary additional resources, lack of credits for renewal of paid subscription, among others. | |
| − | + | If you have any datasource/dashboard copy to receive the [[File:Accept copies icon.png|link=]] icon will appear at the bottom of the screen. By clicking on it, you will be redirected to the [[Copy Dashboards to other users#Accepting_dashboards_copy|received copies]] screen. | |
| − | |||
| − | + | Below is the main page overview: | |
| − | + | :{| class="images-table" | |
| + | |On desktop | ||
| + | |- | ||
| + | |[[File:Main view overview en-US.png|link=]] | ||
| + | |- | ||
| + | |In mobile devices | ||
| + | |- | ||
| + | |[[File:Main view overview mobile en-US.png|link=]] | ||
| + | |} | ||
| − | + | == Top Menu == | |
| − | |||
| − | + | In the top menu you will have access to the following options: | |
| − | = | + | * '''Support''': If you have any questions or problems with TaticView, you can open a [https://support.taticview.com/open.php?&lang=en_US support] ticket with our team. We will be happy to assist you in the best way possible. |
| + | * '''Help''': In this option you will have access to our [[help Index|online documentation]] where you can solve doubts about the operation of TaticView. Our documentation is constantly updated to better describe all the resources available. | ||
| + | * '''Tutorial''': On your first access to TaticView, you will be presented with a brief tutorial on using the application. If you would like to review this tutorial, simply access this option. | ||
| + | * '''Notifications''': See here all your notifications. If you have unread notifications, a counter is displayed. | ||
| + | * '''My account''': Through this menu you have access to your [[Subscriptions|subscription]] configuration, your [[User profile|User profile]], you can [[Change password|change your password]] and manage your [[Tokens|access tokens]]. | ||
| + | * '''Exit''': To log out the application. | ||
| − | + | == Main Menu == | |
| − | |||
| + | The main features on the dashboards and datasources will be available in the main menu. The options available in this menu vary according to the selected tab (Dashboards or Datasources). | ||
| − | |||
| + | If you are accessing TaticView on a ''desktop'', the main menu will be located on the right side of the screen. It will also expand when you hover over one of your items. | ||
| − | + | If the access is being performed through a ''mobile device'', access to the menu will be through the icon [[File:Menu mobile icon.png|link=]]. | |
| − | |||
| − | + | See the details of each option in the main menu below. | |
| − | |||
| − | + | == Dashboards Tab == | |
| − | |||
| + | When you access TaticView, it will be the displayed tab. In it will be available the [[Dashboard|dashboards]] you created, as well as the dashboards that other users share with you, as well as the dashboards that were installed from one of our [[Templates|templates]]. | ||
| − | |||
| − | + | '''[[Manage Dashboards Groups]]''' | |
| − | |||
| − | + | The dashboards are displayed in card format. By clicking on the card, you will [[Execute a Dashboard|execute]] the dashboard. When you position the mouse over the card, the dashboard context menu is displayed, with the options available for this dashboard. The context menu may vary depending on the dashboard. | |
| − | |||
| − | + | In addition, the [[Main Page Overview#Main Menu|main menu]] will also display options specific to the dashboards. | |
| − | |||
| + | The options available in the context menu are (depending on the dashboard type, some options are not available): | ||
| − | |||
| + | * '''Edit dashboard''': Opens the dashboard design so you can make the desired changes. See more in [[Edit dashboard]]. | ||
| + | * '''Share dashboard''': Opens the shares screen of this dashboard so you can share it with more people, as well as edit the shares already made. (option not available for dashboards that were received through sharing). See more in [[Share dashboards]]. | ||
| + | * '''Delete dashboard''': Removes the dashboard. If the dashboard was received through sharing, this option removes the share. The source user dashboard remains unchanged. See more in [[Delete Dashboards]]. | ||
| − | |||
| − | + | The [[Main Page Overview#Main Menu|main menu]] options are: | |
| − | [[ | + | * '''New dashboard''': Opens dashboard design for you to create a new dashboard. Before that, you will be prompted to select which datasource to create the new dashboard on. See more in [[New dashboard]]. |
| + | * '''Share dashboards''': Opens the shared dashboards screen, with all your dashboards that have been shared with other users. You can edit, delete, and/or share other dashboards. See more in [[Share dashboards]] | ||
| + | * '''Accept dashboards''': Opens the screen where all the dashboards shared with you will be displayed. You may accept or decline to the shares. See more in [[Accept shared dashboards|Accept dashboards]]. | ||
| + | * '''Generate dashboards''': Through this option, we'll try to generate some dashboards based on the datasource and fields you've selected. The dashboards generated may be altered by you at any time. See more in [[Generate dashboards]]. | ||
| + | * '''Delete dashboards''': Opens the list so that you select one or more dashboards for deletion. Important, a deleted dashboard can not be recovered. See more in [[Delete Dashboards|Delete dashboards]]. | ||
| + | * '''Slideshow''': Opens the Slideshow setup screen. See more in [[Slideshow]]. | ||
| + | * '''Master dashboard''': Lets you create a template to be used on all your dashboards. In the master dashboard it is not allowed to use data objects, only formatted objects ([[Label|texts]], [[Image|images]], etc). See more in [[Edit Template|Master dashboard]]. | ||
| + | * '''Templates''': Opens our shop for dashboards templates. When installing a template, one (or more) datasource and some dashboards will be available. Simply get the import file, insert your data into it and import it into TaticView to begin your analysis immediately. See more in [[Templates]]. | ||
| + | |||
| + | == Datasources Tab == | ||
| + | |||
| + | |||
| + | On this tab are all your [[Data Sources|datasources]]. Like dashboards, datasources are also displayed in card style. When you position the mouse on the card, the context menu of the datasource is displayed, with the options available for that file. The context menu may vary depending on the datasource and the options configured in your subscription. | ||
| + | |||
| + | |||
| + | The [[Main Page Overview#Main Menu|main menu]] will display the options specific to the datasource. | ||
| + | |||
| + | |||
| + | The options available in the context menu are (options may vary depending on the datasource and the configuration of your signature): | ||
| + | |||
| + | |||
| + | * '''Update datasource''': Opens the import screen for you to update the information in this [[Data Sources|datasource]]. See more in [[Import/Update data|Update datasource]]. | ||
| + | * '''Create new dashboards''': Opens the design screen for you to create a new dashboard, based on this datasource. See more in [[New dashboard]]. | ||
| + | * '''Notify update''': Notifies users with whom you have shared dashboards that the data has been updated. | ||
| + | * '''Send copy''': Send a copy of this datasource and its dashboards to another user. We remember that only the structure is copied, the data/information does not. See more in [[Copy Dashboards to other users|Send copies]]. | ||
| + | * '''Settings''': Opens the datasource properties screen where you can change some settings. | ||
| + | * '''Clear datasource''': Removes all data/information from this datasource. Its structure and dashboards remain. See more in [[Clear a Data Source|Clear datasource]]. | ||
| + | * '''Delete datasources''': Removes the datasource and its dashboards. A confirmation will be requested. See more in [[Delete Data Source|Delete datasource]]. | ||
| + | |||
| + | |||
| + | The [[Main Page Overview#Main Menu|main menu]] options are: | ||
| + | |||
| + | |||
| + | * '''New datasource''': Used for you to import your data files and create new datasource. See more in [[Importing a New Data Source]]. | ||
| + | * '''Update datasource''': Opens the import screen for you to update the information in this datasource, before it asks you to choose which file you want to update. See more in [[Import/Update data|Update datasource]]. | ||
| + | * '''Delete datasources''': Opens the list of datasources so you can remove one or more sources. If the selected datasources have dashboards, they will also be removed. See more in [[Delete Data Source|Delete datasource]]. | ||
| + | * '''Manage copies''': Option used for you to manage for those who already sent copies of datasources/dashboards. See more in [[Copy Dashboards to other users#Managing_Copy_Sent_to_Another_User|Manage copies]]. | ||
| + | * '''Templates''': Opens our shop for dashboards templates. When installing a template, one (or more) datasource and some dashboards will be available. Simply get the import file, insert your data into it and import it into TaticView to begin your analysis immediately. See more in [[Templates]]. | ||
Latest revision as of 19:22, 26 February 2022
The main page
Soon after logging in to TaticView, you are redirected to the Main Page.
This page is divided into two main tabs. The Dashboards tab where the dashboards you create will be available, the dashboards that other users share/copy for you, and also the dashboards that are made available when you install one of our templates. And the Datasources tab where your data files will be available, generated by importing your spreadsheets/files, as well as the data files made available when you install one of our templates.
On the main page, you'll still have access to your account settings, support, our help documentation, you can check your notifications, etc.
In addition, on the main page, you may receive alerts regarding your subscription. Such as ending the validity of temporary additional resources, lack of credits for renewal of paid subscription, among others.
If you have any datasource/dashboard copy to receive the ![]() icon will appear at the bottom of the screen. By clicking on it, you will be redirected to the received copies screen.
icon will appear at the bottom of the screen. By clicking on it, you will be redirected to the received copies screen.
Below is the main page overview:
On desktop 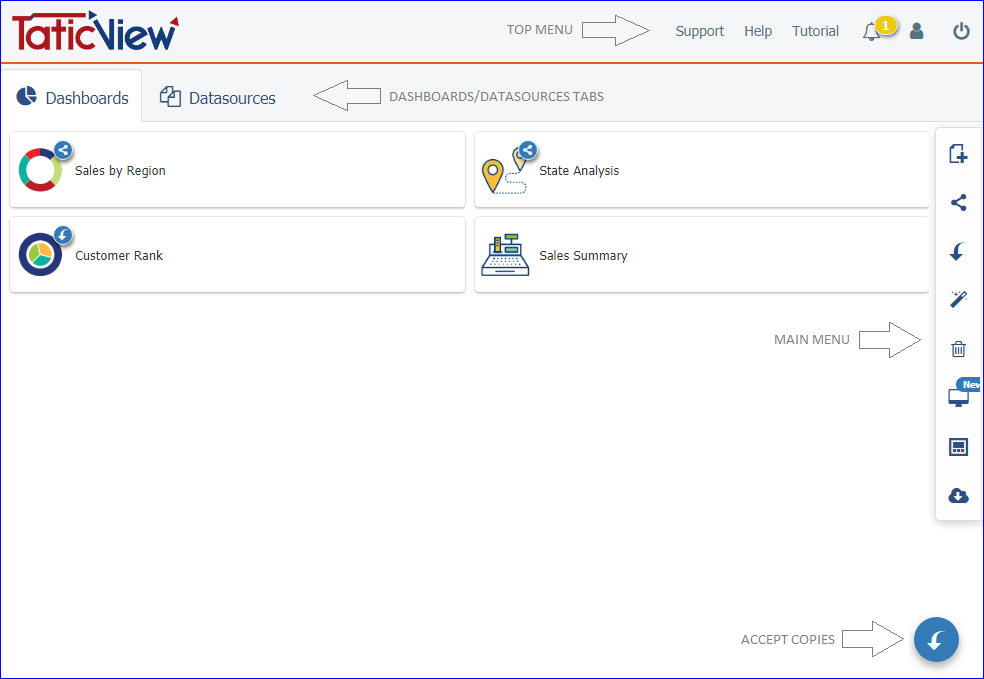
In mobile devices 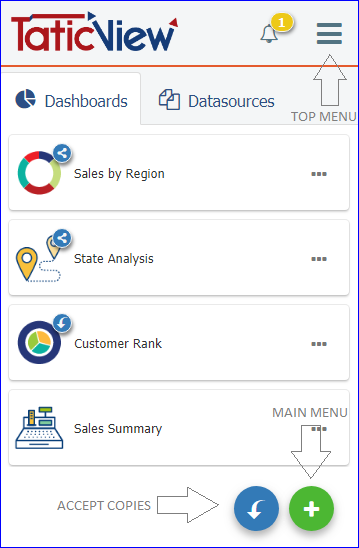
Top Menu
In the top menu you will have access to the following options:
- Support: If you have any questions or problems with TaticView, you can open a support ticket with our team. We will be happy to assist you in the best way possible.
- Help: In this option you will have access to our online documentation where you can solve doubts about the operation of TaticView. Our documentation is constantly updated to better describe all the resources available.
- Tutorial: On your first access to TaticView, you will be presented with a brief tutorial on using the application. If you would like to review this tutorial, simply access this option.
- Notifications: See here all your notifications. If you have unread notifications, a counter is displayed.
- My account: Through this menu you have access to your subscription configuration, your User profile, you can change your password and manage your access tokens.
- Exit: To log out the application.
Main Menu
The main features on the dashboards and datasources will be available in the main menu. The options available in this menu vary according to the selected tab (Dashboards or Datasources).
If you are accessing TaticView on a desktop, the main menu will be located on the right side of the screen. It will also expand when you hover over one of your items.
If the access is being performed through a mobile device, access to the menu will be through the icon ![]() .
.
See the details of each option in the main menu below.
Dashboards Tab
When you access TaticView, it will be the displayed tab. In it will be available the dashboards you created, as well as the dashboards that other users share with you, as well as the dashboards that were installed from one of our templates.
The dashboards are displayed in card format. By clicking on the card, you will execute the dashboard. When you position the mouse over the card, the dashboard context menu is displayed, with the options available for this dashboard. The context menu may vary depending on the dashboard.
In addition, the main menu will also display options specific to the dashboards.
The options available in the context menu are (depending on the dashboard type, some options are not available):
- Edit dashboard: Opens the dashboard design so you can make the desired changes. See more in Edit dashboard.
- Share dashboard: Opens the shares screen of this dashboard so you can share it with more people, as well as edit the shares already made. (option not available for dashboards that were received through sharing). See more in Share dashboards.
- Delete dashboard: Removes the dashboard. If the dashboard was received through sharing, this option removes the share. The source user dashboard remains unchanged. See more in Delete Dashboards.
The main menu options are:
- New dashboard: Opens dashboard design for you to create a new dashboard. Before that, you will be prompted to select which datasource to create the new dashboard on. See more in New dashboard.
- Share dashboards: Opens the shared dashboards screen, with all your dashboards that have been shared with other users. You can edit, delete, and/or share other dashboards. See more in Share dashboards
- Accept dashboards: Opens the screen where all the dashboards shared with you will be displayed. You may accept or decline to the shares. See more in Accept dashboards.
- Generate dashboards: Through this option, we'll try to generate some dashboards based on the datasource and fields you've selected. The dashboards generated may be altered by you at any time. See more in Generate dashboards.
- Delete dashboards: Opens the list so that you select one or more dashboards for deletion. Important, a deleted dashboard can not be recovered. See more in Delete dashboards.
- Slideshow: Opens the Slideshow setup screen. See more in Slideshow.
- Master dashboard: Lets you create a template to be used on all your dashboards. In the master dashboard it is not allowed to use data objects, only formatted objects (texts, images, etc). See more in Master dashboard.
- Templates: Opens our shop for dashboards templates. When installing a template, one (or more) datasource and some dashboards will be available. Simply get the import file, insert your data into it and import it into TaticView to begin your analysis immediately. See more in Templates.
Datasources Tab
On this tab are all your datasources. Like dashboards, datasources are also displayed in card style. When you position the mouse on the card, the context menu of the datasource is displayed, with the options available for that file. The context menu may vary depending on the datasource and the options configured in your subscription.
The main menu will display the options specific to the datasource.
The options available in the context menu are (options may vary depending on the datasource and the configuration of your signature):
- Update datasource: Opens the import screen for you to update the information in this datasource. See more in Update datasource.
- Create new dashboards: Opens the design screen for you to create a new dashboard, based on this datasource. See more in New dashboard.
- Notify update: Notifies users with whom you have shared dashboards that the data has been updated.
- Send copy: Send a copy of this datasource and its dashboards to another user. We remember that only the structure is copied, the data/information does not. See more in Send copies.
- Settings: Opens the datasource properties screen where you can change some settings.
- Clear datasource: Removes all data/information from this datasource. Its structure and dashboards remain. See more in Clear datasource.
- Delete datasources: Removes the datasource and its dashboards. A confirmation will be requested. See more in Delete datasource.
The main menu options are:
- New datasource: Used for you to import your data files and create new datasource. See more in Importing a New Data Source.
- Update datasource: Opens the import screen for you to update the information in this datasource, before it asks you to choose which file you want to update. See more in Update datasource.
- Delete datasources: Opens the list of datasources so you can remove one or more sources. If the selected datasources have dashboards, they will also be removed. See more in Delete datasource.
- Manage copies: Option used for you to manage for those who already sent copies of datasources/dashboards. See more in Manage copies.
- Templates: Opens our shop for dashboards templates. When installing a template, one (or more) datasource and some dashboards will be available. Simply get the import file, insert your data into it and import it into TaticView to begin your analysis immediately. See more in Templates.